 |  |

The screen shots and the explanation in this section were supplied by Kevin Buettner, Tom Dickey, and Paul Fox. We thank them.
There are several X11 interfaces for vile, each utilizing a different toolkit based on the Xt library. There is a plain "No Toolkit" version which does not use a toolkit, but has custom scrollbars and a bulletin board widget for geometry management. There are versions which use the Motif, Athena, or OpenLook toolkits. Of these, the "No Toolkit" version is probably best supported since that is the version that some of vile's authors most frequently use. But the Motif and Athena versions have more features, such as menu support.
Fortunately, the basic interface is the same for each of these versions. There is a single top level window which may be split into two or more panes. The panes, in turn, may be used to display multiple views of a buffer or multiple buffers or mixture of both. In vile parlance these panes are called "windows," but to avoid confusion, we will continue to call them "panes" in the following discussion.
To build xvile, you have to choose which toolkit version to use. This is done when you configure vile with the configure command. The relevant options are:
The figures show xvile's Motif interface. It is similar to the Athena interface.

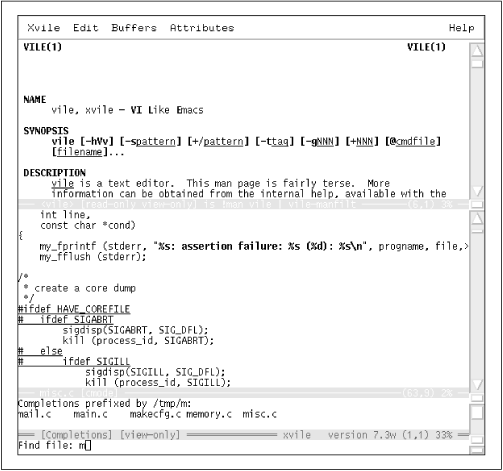
Figure 12.1 shows three panes:
The man page for vile, which shows the use of underlining and boldface.
A buffer misc.c, from tin, which shows syntax highlighting (again, underlining, this time for preprocessor statements, and boldface, for quoted strings).
A three-line pane, which is active (noted by a darker status line), named [Completions], for filename completions. The pane is coordinated with the minibuffer (the colon command line): the first line reads Completions prefixed by /tmp/m:, and the minibuffer reads Find file: m. The rest of the pane contains the actual filenames which match. The first line of [Completions] and the contents change as the user completes the filename (and presses TAB to tell vile to show the reduced set of choices).

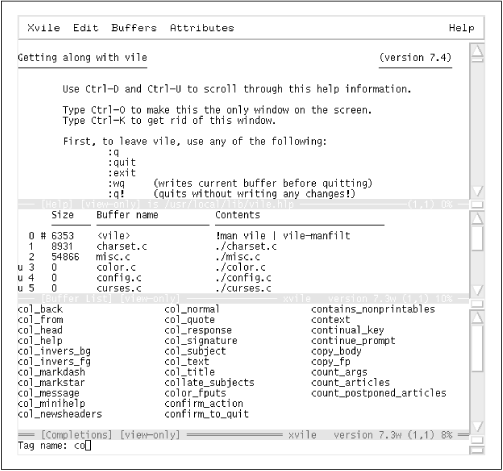
Figure 12.2 also shows three panes:
The [Help] pane, which of course shows the most
important feature of an editor (how to exit without
modifying your files). 
The [Buffer List], which indicates that [Help] is the # (previous) buffer. The % (current) buffer is not shown on the list, since only the "visible" buffers are displayed in this copy of [Buffer List]. Supplying an argument to the * command would have shown the invisible buffers as well. Buffers 1 and 2 are charset.c and misc.c. They have been loaded, so their sizes (8931 and 54866) are displayed in the [Buffer List]. Buffers 3, 4, and 5 (color.c, config.c, and curses.c) have not been loaded, so a u is displayed in the first column, and the size is shown as zero.
The [Completions] buffer is active. This time it displays tag completions for the partial match co, and the Completions prefixed message is not shown because the buffer is scrolled down, which is another side effect of pressing TAB: vile cycles through a scrolling action so that all of the choices will be shown even when the window is small. (The v/V commands don't do anything to the [Completions] buffer while the cursor is in the minibuffer; the [Completions] buffer is automatically sized.)
At the right of each pane is a scrollbar which may be used in the customary fashion to move about in the buffer. Note, however, that the customary fashion varies from toolkit to toolkit. In the Athena and "No Toolkit" version, the middle mouse button may be used to drag the "thumb" or visible indicator around. The left and right mouse buttons move down or up (respectively) in the buffer. The amount moved depends on the location of the mouse cursor on the scrollbar. Placing it near the top will scroll by as little as one line. When placed near the bottom, the text will scroll by as much as a full paneful.
The Motif and OpenLook scrollbars are probably more familiar. The left-most mouse button is used for all operations. Clicking on the little arrows will move up or down by one line. The scrollbar indicator may be dragged in order to move about and scrolling up or down by an entire pane may be accomplished by clicking above or below the indicator. The OpenLook scrollbars provide additional mechanisms for quickly moving to the top or bottom of the buffer.
In each version, there is a small handle above or below (i.e., between) scrollbars which may be used to adjust the size of two adjacent panes. In the "No Toolkit" version of xvile, the pane resize handle blends in with the mode line of two adjacent panes. In the other versions, the resize handle is more distinguishable. But in each case, the mouse cursor will change to a heavy vertical double arrow when placed above the resize handle. The windows may be resized by clicking on and dragging the handle.
A pane may be split into two by holding the control key down and clicking the left mouse button on a scrollbar. Then you will have two views of a particular buffer. Other vile commands may be used to replace one of the views with another buffer if desired. A pane may be deleted by holding the control key down and clicking the middle mouse button. Sometimes after creating a lot of panes, you find yourself wanting to use all of the window real estate for just one pane. To do this, control-click the right mouse button; all other panes will be removed, leaving the entire xvile window containing only the pane on which you clicked.
Within the text area of a pane, the cursor may be set by clicking the left mouse button. This not only sets the cursor position, but also sets the pane in which editing is being done. In order to set just the pane but preserve the old position, click on the mode line below the text you wish to edit.
A mouse click is viewed as a motion just like 4j is considered a motion. To delete five lines, you could enter d4j which will delete the current line and the four below it. You can do the same thing with a mouse click. Position your cursor at the place you want to start deleting from and then press d. After this, click in the buffer at the point to which you wish to delete to. Mouse clicks are real motions and may be used with other operators as well.
Selections may be made by holding the left mouse button down and dragging with the mouse. Release of the mouse button will cause the selection to be yanked and made available (if desired) for pasting. You can force the selected region to be rectangular by holding the control key down while dragging with the left button depressed. If the dragging motion goes out of the current window, text will be scrolled in the appropriate direction, if possible, to accommodate selections larger than the window. The speed at which the scrolling occurs will increase with the passage of time, making it practical to select large regions of text quickly.
Individual words or lines may be selected by double- or triple-clicking on them.
A selection may be extended by clicking the right mouse button. As with button one, the selection may be adjusted or scrolled by holding the right button down and dragging with it. Selections may be extended in any window open to the same buffer as the one in which the selection was started. That is, if you have two views of a buffer (in two different panes), one containing the start of the buffer, and the other the end, it is possible to select the entire buffer by clicking the left button at the beginning of the pane showing the beginning of the buffer and then clicking the right button in the pane showing the end of the buffer. Also, selections may be extended in a rectangular fashion by holding the control key down in conjunction with the use of the right mouse button.
The middle button is used for pasting the selection. By default, it pastes at the last text cursor position. If the shift key is held down while clicking the middle button, the paste occurs at the position of the mouse cursor.
A selection may be cleared (if owned by xvile) by double-clicking on one of the mode lines.
Data may be exchanged between many X applications via the PRIMARY selection. This selection is set and manipulated as described above.
Other applications, most notably OpenLook applications, use the CLIPBOARD selection to exchange data between applications. On many Sun keyboards, selected text is moved to the clipboard by pressing the COPY key and pasted by pressing the PASTE key. If you find that you cannot paste text selected in xvile into other applications or vice versa, it may well be that these applications use the CLIPBOARD selection instead of the PRIMARY selection. (The other mechanism used among really old applications involves the use of a ring of cut buffers.)
xvile provides two commands for manipulating the clipboard. These are copy-to-clipboard and paste-from-clipboard. When copy-to-clipboard is executed, the contents of the current selection are copied to the special clipboard kill register (denoted by ; in the register list). When an application requests the clipboard selection, xvile gives it the contents of this kill register. The paste-from-clipboard command requests clipboard data from the current owner of the CLIPBOARD selection.
Users of Sun systems may want to put the following key bindings in their .vilerc file in order to make use of the COPY and PASTE keys found on their keyboards:
bind-key copy-to-clipboard #-^
bind-key paste-from-clipboard #-*
Key bindings are described in detail later in this chapter.
xvile has many resources which may be used to control appearance and behavior. Font choice is particularly important if you want italic or oblique fonts to be displayed properly. vile's documentation has a complete list of resources as well a sample set of .Xdefault entries.
The Motif and Athena versions have menu support. Menu items, which are user-definable, are read from the .vilemenu file, in the current or home directory.
xvile allows three types of menu items:
Built-in, i.e., specific to the menuing system, such as rereading the .vilerc file, or spawning a new copy of xvile
Direct invocation of built-in commands (e.g., displaying the [Buffer List])
Invocation of arbitrary command strings (e.g., running interactive macros such as a search command)
The distinction between the last two is made because the authors prefer making vile able to check the validity of commands before they are executed.
The sidebar in this chapter contains an annotated sample .vilemenu file.

Copyright © 2003 O'Reilly & Associates. All rights reserved.