 |  |

ODBC provides a data abstraction layer that is particularly useful for accessing some of Microsoft's products—such as Access, Excel, MS SQL Server, and others—through a common interface. It's like the PEAR DB abstraction class we talked about in Chapter 8. In this section we show you how to configure a database for control via ODBC, and how to access an ODBC database from PHP.
As with PEAR DB, you identify an ODBC database with a data source name (DSN). With ODBC, however, you must explicitly create the mapping between a DSN and its database. This section steps through configuring the built-in Excel ODBC driver, but the process is similar for Access, MySQL, and other databases.
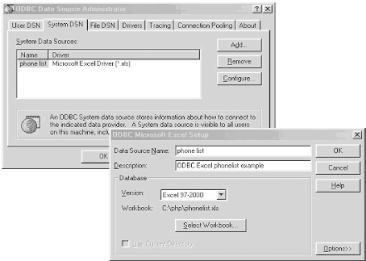
Open the Control Panels folder, and double-click on the ODBC Data Sources icon. The resulting dialog box is the ODBC Data Source Administrator. Select the System DSN tab, click the Add button, and select the driver for your target database. If the driver is not listed, you will need to obtain one from your database vendor. If you've installed Microsoft Office products on your computer, you will have all the drivers that you need to use Excel as a primitive database. Figure 15-5 shows the addition of a System DSN for a Microsoft Excel workbook.

Press the Configure button in the top window to select a specific workbook to use as the data source. In Figure 15-5, we've selected a workbook named phonelist.xls, located in the root-level PHP directory on drive C.
Because ODBC must guess the data type of each column of data returned by a query, the only remaining configuration required is to specify the number of rows used to make this guess. In our example we used the default value of eight rows, meaning that eight rows of results will be looked at to try to determine the data type of each column.
Once the selection and naming process is complete for your ODBC data source, click the OK button, and you will see that your new data source has been added to the list of System DSNs. From then on, you are ready to use the DSN.
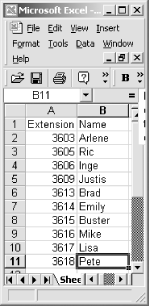
Assuming we have an Excel spreadsheet with two columns, a list of phone extensions and a list of names, we could pull all records from the spreadsheet with the code shown in Example 15-4.
<?php
 $dd = odbc_connect ("phone list", "user", "password");
 $result = odbc_exec ($dd, "select * from [Sheet1$]");
 odbc_result_all($result, "bgcolor='DDDDDD' cellpadding = '1'");
?>
ODBC imposes a uniform view of all databases, so even though Excel doesn't require a password, we still must provide one. In cases where the username and password don't matter, we can provide anything we like, as they are ignored. Thus, in Example 15-4, in the call to odbc_connect( ), we pass dummy values. The first parameter to odbc_connect( ) is the DSN, as assigned from the Control Panel.
The next step is to execute a SELECT statement using odbc_exec( ). The SELECT statement in Example 15-4 is unusual because of the way Excel maps spreadsheets onto tables. The [Sheet1$] syntax can be avoided in two ways. First, you can simply rename the worksheet to something descriptive, such as phonelist, by right-clicking in the Worksheet tab and selecting the Rename function. Refer to the renamed table in the SELECT statement as:
select * from [phonelist$]
Alternatively, you can create a named range in the Excel workbook and
refer to it directly. Select Insert  Name
Name
 Define, and supply a name and workbook range. You
can then omit the trailing $, and refer to the
table as [phonelist].
The problem with the latter solution is that only the two forms of table name that have the trailing $ allow us to refer directly to column names. For example:
$result = odbc_exec ($dd, "INSERT into [phonelist$] ([Extension], [Name])
  values ( '33333', 'George')");
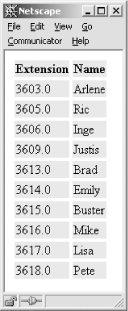
The odbc_result_all( ) function prints the results as an HTML table. There are odbc_fetch_into( ), odbc_fetch_row( ), and odbc_fetch_array( ) functions that return the results as PHP values. The code, when run on an Excel table containing the data shown in Figure 15-6, produces the formatted table shown in Figure 15-7.


Example 15-4 demonstrates the ease of basic ODBC interaction with an Excel spreadsheet, along with some of its peculiarities. But there are some things to be aware of:
By default, all tables are opened read-only. To write to tables, you must uncheck the read-only box during Excel DSN setup.
Column names over 64 characters will produce an error.
Do not use an exclamation point character (!) in a column names.
Unspecified (blank) column names will be replaced with driver-generated names.
Applications that want to use the Save As option for Excel data should issue a CREATE TABLE statement for the new table and then do subsequent INSERT operations into the new table. INSERT statements result in an append to the table. No other operations can be done on the table until it is closed and reopened the first time. After the table is closed the first time, no subsequent inserts can be done.
The Excel ODBC driver does not support DELETE, UPDATE, CREATE INDEX, DROP INDEX, or ALTER TABLE statements. While it is possible to update values, DELETE statements do not remove a row from a table based on an Excel spreadsheet.
If you can work with these limitations, combining PHP with Excel through an ODBC interface may be acceptable.
Although the primary source of documentation for the Excel ODBC drivers is the Microsoft Desktop Database Drivers Help file, invoked from the Help buttons under ODBC Administrator, you can also determine some of the peculiarities of Excel's support for ODBC via Excel's online help. However, it will take a good deal of poking around to find what you need. Much of the time, you will find yourself searching for answers through your favorite search engine, or in the annotated help files at http://www.php.net.
A more sophisticated example of PHP's ODBC support is demonstrated in our next example. Here we store the phone-list data in an Access database, which has slightly more robust ODBC support.
We use only four ODBC functions from PHP:
$handle = odbc_connect(dsn, user, password [, cursor_type]);
$success = odbc_autocommit(handle, status);
$result = odbc_exec(handle, sql);
$cols = odbc_fetch_into(result [, rownumber, result_array]);
There are strong parallels between ODBC and PEAR DB. First you connect to the database, then you execute queries and fetch the results. You need to connect only once within each script, and the connection is automatically closed when the script ends.
The odbc_autocommit( ) function controls transactions. By default, changes to the database (UPDATE, DELETE, and INSERT commands) take place as soon as the query is executed. That's the effect of autocommitting. Disable autocommits, however, and changes will be visible to you but will be rolled back if the script ends without a COMMIT SQL statement being executed.
Example 15-5 shows a script that lets the user enter a new record into the phone database. The same script handles displaying the form, displaying the confirmation page, and actually adding the information to the database. The value passed into the script by the submit button indicates how the script should behave. We use autocommit to optimize the code somewhat: if we're displaying the confirmation page, we turn off autocommit, add the record to the database, and display it. When the script ends, the addition is rolled back. If we're actually adding the information, we leave autocommit on but otherwise do exactly the same database steps as for confirmation, so the addition isn't rolled back at the end of the script.
<html>
<head>
<title>ODBC Transaction Management</title>
</head>
<body>
<h1>Phone List</h1>

<?php
 $dd = odbc_connect (PhoneListDSN, user, password);

 // disable autocommit if we're confirming
 if ($submit == "Add Listing") {
     $start_trans = odbc_autocommit ($dd, 0);
 }

 // insert if we've got values submitted
 if ($submit == "Add Listing" || $submit == "Confirm") {
     $sql  = "insert into phone_list ([extension],[name])";
     $sql .= " values ('$ext_num', '$add_name')";
     $result = odbc_exec($dd, $sql);
 }
?>

<form method="post" action="phone_trans.php">

<table>
<tr><th bgcolor="#EEEEEE">Extension</th>
    <th bgcolor="#EEEEEE">Name</th>
</tr>

<?php
 // build table of extension and name values
 $result = odbc_exec ($dd, "select * from phone_list");
 $cols = array( );
 $row = odbc_fetch_into($result, $cols);
 while ($row) {
     if ($cols[0] == $ext_num && $submit != "Confirm") {
?>
<tr><td bgcolor="#DDFFFF"><?= $cols[0] ?></td>
<td bgcolor="#DDFFFF"><?= $cols[1] ?></td></tr>
<?php
     } else {
         print("<tr><td>$cols[0]</td><td>$cols[1]</td></tr>\n");
     }
    $row = odbc_fetch_into($result, $cols);
 }

 // if we're confirming, make hidden fields to carry state over
 // and submit with the "Confirm" button

 if ($submit == "Add Listing") {
?>
</table>
<br>
<input type="hidden" name="ext_num" value="<?= $ext_num ?>">
<input type="hidden" name="add_name" value="<?= $add_name ?>">
<input type="submit" name="submit" value="Confirm">
<input type="submit" name="submit" value="Cancel">
<?php
 } else {
 // if we're not confirming, show fields for new values
?>
<tr><td><input type="text" name="ext_num" size="8" maxlength="4"></td>
<br>
<td><input type="text" name="add_name" size="40" maxlength="40"></td>
<br>
</tr>
<br>
</table>
<br>
<input type="submit" name="submit" value="Add Listing">
<br>
<?php
 }
?>
</form>
</body>
</html>

Copyright © 2003 O'Reilly & Associates. All rights reserved.