 |  |

In this section, we briefly introduce the JavaScript scripting language as a client-side method for validation and other simple tasks. JavaScript isn't a fully fledged programming language like PHP: it can't connect to databases, it's limited as to which system resources it can interact with, and it can't do most tasks a web database application requires. However, JavaScript is good for interacting with a <form> and for controlling the display of data to the user.
NOTE: The client-side scripting language we use here is best known as Java-Script. However, in June 1998, the European Computer Manufacturers Association (ECMA) agreed to be responsible for the standard implementations of the scripting language by Microsoft, Netscape, and Sun. Accordingly, the real name of the language is now ECMA-Script, based on the standard ECMA-262. The most recent version of ECMA-262 is the third edition, dated December 1999.
Common uses of JavaScript in web database applications include:
Validation of <form> data, the main topic of this section.
Simple interaction with <form> data; e.g., JavaScript is often used to calculate values and display these in a data-entry widget.
Enhancing user interactions by adding dynamic elements to a web page. Common features include pull-down menus, mouseover changes to the presentation (rollovers ), and dialog boxes.
Customizing the browser and using information from the browser to enhance presentation.
Most of these techniques are oriented around events. An event is an action that occurs—such as a mouse passing over an object or a user clicking on a button—and that can be trapped through JavaScript code.
WARNING: In a web database application, client-side validation should implement the same or less validation than a server-side script.Never rely on client-side validation as the only method to ensure that system requirements, security policies, or DBMS constraints are met.
Client-side validation is optional but has benefits, including faster response to the user than server-side validation, a reduction in web-server load, and a reduction in network traffic. Moreover, client-side validation can be implemented as interactive validation, not only as post-validation, as on the server side. However, validation in the client tier is unreliable: the user can bypass the validation through design, error, or configuration. For that reason, client-side validation is a tool that should be used only to improve speed, reduce load, and add features, and never to replace server-side validation.
Consider the short JavaScript validation example in Example 7-1.
<!DOCTYPE HTML PUBLIC
               "-//W3C//DTD HTML 4.0 Transitional//EN"
               "http://www.w3.org/TR/html4/loose.dtd">
<html>
<head>
  <title>Simple JavaScript Example</title>

<script type="text/javascript">
<!-- Hide the script from old browsers
function containsblanks(s)
{
  for(var i = 0; i < s.value.length; i++)
  {
      var c = s.value.charAt(i);
      if ((c == ' ') || (c == '\n') || (c == '\t'))
      {
          alert('The field must not contain whitespace');
          return false;
      }
  }
  return true;
}
// end hiding -->
</script>
</head>

<body>
  <h2>Username Form</h2>
  <form onSubmit="return(containsblanks(this.userName));"
   method="post" action="test.php">
  <input type="text" name="userName" size=10>
  <input type="submit" value="SUBMIT">
  </form>
</body>
</html>
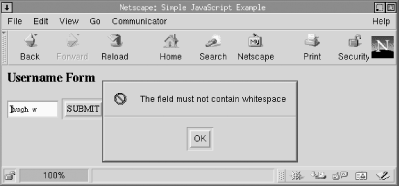
This example is designed to check if a userName field contains whitespace and, if so, to show a dialog box containing an error message to the user. The dialog box is shown in Figure 7-1.

The example contains no PHP but only a mixture of HTML and JavaScript. Almost all the JavaScript is encapsulated between the <script> and </script> tags in the first 17 lines of the example. The JavaScript function contained in the tags, containsblanks( ), is executed when the user submits the <form>.
The function call is part of the <form> element:
<form onSubmit="return(containsblanks(this.userName));"
  method="post" action="test.php">
When the submission event occurs—the user presses the Submit button—the onSubmit action handler is triggered. In this case, the function containsblanks( ) is called with one parameter, this.userName. The object this refers to the <form> itself and the expression this.userName refers to the input widget within the <form>. The function call itself is wrapped in a return( ) expression. The overall result of executing containsblanks( ) is that if the function returns false, the <form> isn't submitted to the server; if the function returns true, the HTTP request proceeds as usual.
The syntax of the JavaScript code is similar to PHP, and to other languages such as C and Java. The function containsblanks( ) works as follows:
A for loop repeatedly performs actions on the characters entered by the user. The expression s.value.length refers to the length of the string value entered by the user into the userName widget. The length property is one of the predefined properties of the value attribute of the <input> widget.
Each character in the string entered by the user is stored in a character variable c. s.value.charAt(i) is again an expression related to the value entered by the user in the <form>. The value attribute of the widget has an associated function (or, more correctly, a method) called charAt( ) that returns the value of the character at the position passed as a parameter. For example, if the user enters test in the widget, s.value.charAt(0) returns t, and s.value.charAt(1) returns e.
The if statement checks whether the current character is a space, a tab character, or a carriage return. If so, the alert( ) function is called with an error string as a parameter. The alert( ) function presents a dialog box in the browser that shows the error message and has an OK button, as shown in Figure 7-1. When the user clicks OK, the function returns false, and the submission process stops.
If the string doesn't contain any whitespace, the function containsblanks( ) returns true, and the <form> submits as usual.
Note that the HTML comment tags are included inside the <script> tags and surround the actual body of the JavaScript script. This is good practice, because if JavaScript is disabled or the user has an old browser that knows nothing about scripts, the comments hide the script from a potentially confused browser. An old browser happily displays the HTML page as usual, and most also ignore the onSubmit event handler in the <form> element.
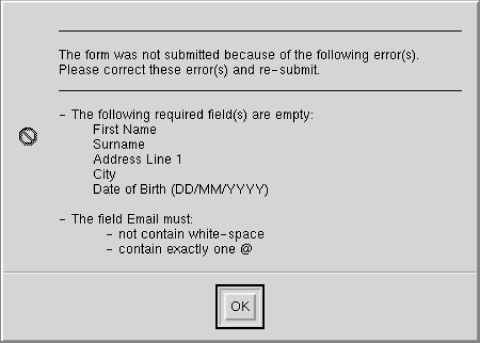
The example in this section shows more features of JavaScript as a validation tool. An example of errors produced by applying the techniques described in this section to customer validation is shown in Figure 7-2.

A sophisticated and general-purpose data entry function for post-validation and batch error reporting is shown in Example 7-2. Only part of the script is shown; the remainder of the script includes the same PHP code to retrieve data and the HTML to display the customer <form> as in Example 6-7 in Chapter 6.
<!-- The following code is a modified version of that
     described below -->

<!-- This example is from the book _JavaScript:
     The Definitive Guide_.  -->
<!-- Written by David Flanagan.  Copyright (c) 1996
     O'Reilly & Associates. -->
<!-- This example is provided WITHOUT WARRANTY either
     expressed or implied.-->
<!-- You may study, use, modify, and distribute it for
     any purpose.  -->

<!DOCTYPE HTML PUBLIC
              "-//W3C//DTD HTML 4.0 Transitional//EN"
              "http://www.w3.org/TR/html4/loose.dtd">
<html>
<head>
  <title>Customer Entry Form</title>

<script type="text/javascript">
<!-- Hide the script from old browsers

// A utility function that returns true if a string
// contains only whitespace characters.
function isblank(s)
{
  for(var i = 0; i < s.length; i++)
  {
     var c = s.charAt(i);
     if ((c != ' ') &&
         (c != '\n') &&
         (c != '\t'))
        return false;
  }
  return true;
}


// This is the function that performs <form> validation.
// It will be invoked from the onSubmit( ) event handler.
// The handler should return whatever value this function
// returns.
function verify(f)
{
  var msg;
  var empty_fields = "";
  var errors = "";

  // Loop through the elements of the form, looking for all
  // text and textarea elements that don't have an
  //  "optional" property defined.  Then, check for fields
  // that are empty and make a list of them.
  // Also, if any of these elements have a "min" or a "max"
  // property defined, then verify that they are numbers
  // and that they are in the right range.
  // Put together error messages for fields that are wrong.
  for(var i = 0; i < f.length; i++)
  {
     var e = f.elements[i];

     if (((e.type == "text") ||
         (e.type == "textarea")) &&
         !e.optional)
     {
        // first check if the field is empty
        if ((e.value == null) ||
            (e.value == "") ||
            isblank(e.value))
        {
           empty_fields += "\n        " +
                           e.description;
           continue;
        }

        // Now check for fields that are supposed
        // to be numeric.
        if (e.numeric ||
           (e.min != null) ||
           (e.max != null))
        {
           var v = parseFloat(e.value);
           if (isNaN(v) ||
              ((e.min != null) && (v < e.min)) ||
              ((e.max != null) && (v > e.max)))
           {
              errors += "\n- The field " +
                        e.description +
                        " must be a number";
              if (e.min != null)
                 errors += " that is greater than " +
                           e.min;

              if (e.max != null &&
                  e.min != null)
                 errors += " and less than " +
                           e.max;

              else if (e.max != null)
                 errors += " that is less than " +
                           e.max;

              errors += ".\n";
           }
        }

        // Now check for fields that are supposed
        // to be emails.
        // Not exactly as described in RFC 2822, but
        // a rough attempt
        // of the form "local-bit@domain-bit"
        if (e.email && !isblank(e.value))
        {
           var seenAt = false;
           var append = "";
           for(var j = 0; j < e.value.length; j++)
           {
              var c = e.value.charAt(j);
              if ((c == ' ') ||
                  (c == '\n') ||
                  (c == '\t'))
                 append +=
     "\n           - not contain white-space";
              if ((c == '@') && (seenAt == true))
                 append +=
     "\n           - contain only one @";
              if ((c == '@'))
                 seenAt = true;
           }

           if (seenAt == false)
              append +=
     "\n           - contain exactly one @";
           if (append)
              errors += "- The field " +
                        e.description +
                        " must: " + append;
        }

        // Now check for fields that are supposed
        // to be DOBs.
        if (e.dob && !isblank(e.value))
        {
           var slashCount = 0;
           var append = "";
           var addedError1 = false;
           var addedError2 = false;

           for(var j = 0; j < e.value.length; j++)
           {
              var c = e.value.charAt(j);

              if ((c == '/'))
                 slashCount++;

              if (c != '/' &&
                 (c < '0' || c > '9') &&
                 addedError1 == false)
              {
                 addedError1 = true;
                 append +=
     "\n           - must contain only numbers " +
     "and forward-slashes";
              }
           }

           if (j != 10 || slashCount != 2)
              append +=
     "\n           - must have the format DD/MM/YYYY";
           if (slashCount != 2)
              append +=
     "\n           - must contain two slashes";
           if (append)
              errors +=  "- The field " +
                         e.description +
                         " must: " + append;
        }

        // Now check for fields that are supposed
        // not to have spaces
        if (e.nospaces)
        {
           var seenAt = false;
           var append = "";

           for(var j = 0; j < e.value.length; j++)
           {
              var c = e.value.charAt(j);

              if ((c == ' ') ||
                  (c == '\n') ||
                  (c == '\t'))
                 errors += "- The field " + e.description +
                           " must not contains white-space";
           }
        }

     } // if (type is text or textarea) and !optional
  } // for each character in field

  // Now, if there were any errors, then display the
  // messages, and return true to prevent the form from
  // being submitted.  Otherwise return false
  if (!empty_fields && !errors)
     return true;

  msg  = "____________________________________________________  _  _\n\n"
  msg += "The form was not submitted because of the " +
         "following error(s).\n";
  msg += "Please correct these error(s) and re-submit.\n";
  msg += "____________________________________________________  _  _\n\n"

  if (empty_fields)
  {
     msg += "- The following required field(s) are empty:"
           + empty_fields + "\n";
     if (errors)
        msg += "\n";
  }
  msg += errors;
  alert(msg);
  return false;
}
// end hiding -->
</script>

</head>
<body>
<h2>Customer Details</h2>
<hr>
<form onSubmit="this.firstName.nospaces = true;
  this.firstName.description = 'First Name';
  this.surname.description = 'Surname';
  this.address1.description = 'Address Line 1';
  this.city.description = 'City';
  this.email.description = 'Email';
  this.email.email = true;
  this.dob.dob = true;
  this.dob.description = 'Date of Birth (DD/MM/YYYY)';
  return verify(this);"
  method="post" action="example.6-8.php">
In the example, the <form> tag contains a long script for the onSubmit event that is called when the user clicks the Submit button. The code creates and sets properties for each data entry widget. As all widgets are mandatory, a description property is created and set (e.g., this.email.description = 'Email'). This description is later displayed in an error dialog box if data isn't entered. For widgets that are optional—there are none in this example, but the full customer <form> in Chapter 10 has them—an optional = true property can be set.
For widgets that require specific validation, a property that describes the data type is set. For example, the email widget has a property of this.email.email = true to ensure that validation appropriate to an email field is performed. After setting all properties for all fields, the verify( ) function is called with the <form> (this refers to the <form>) object as a parameter; the <form> object includes all widgets and their properties.
For compactness, we don't describe in detail how the verify( ) function works. However, it has the following features:
The function progressively creates a message to display to the user—much like $errorString in the PHP validation—as errors are detected. After collecting all errors, an error dialog box is shown listing all errors the user needs to correct before the <form> will submit. An example of the error dialog box is shown in Figure 7-2.
All widgets that are inputs of type text or textarea and aren't optional are checked to ensure they contain data.
Numeric fields are checked to ensure they are actually numeric and, if the value must fall in a range, the value is checked to ensure it's within the range.
Emails are checked in a simplistic way. The email must contain exactly one @ symbol and must not contain whitespace.
Dates are checked to ensure they are in the DD/MM/YYYY format used in most countries.
Fields that should not contain whitespace are checked to ensure they don't contain spaces, tabs, or carriage returns.
The verify( ) function isn't comprehensive and certainly doesn't do all the validation proposed for the winestore customer <form>. However, in most cases, the customer <form> can't be submitted without a good chance of it passing the server-side validation checks.
JavaScript code can be reused across multiple HTML pages without adding the code to each page. For example, the code surrounded by the <script> and </script> tags in Example 7-2 can be saved in the file valid.js and then included into several HTML pages using the src attribute of the <script> element:
<script type="text/javascript" src="valid.js">
</script>
This approach has the advantage of reducing network traffic if the user has a web browser cache, because a copy of the script can be reused in multiple HTML pages.
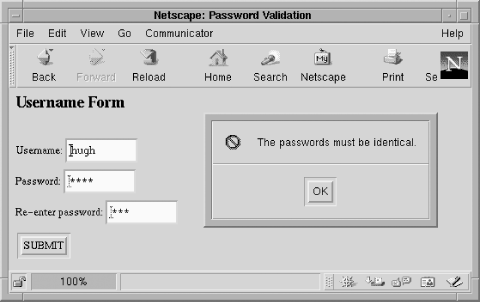
Example 7-3 gives a final example of JavaScript validation. In this example, the validation is interactive; that is, the fields are validated as data is entered. Instead of the onSubmit event, an onChange event is trapped for the two password widgets, formPassword1 and formPassword2; the function thesame( ) is called whenever the user changes the data in a widget and then leaves it. The reporting is field-by-field, and a sample dialog box output by the script is shown in Figure 7-3.

The function thesame( ) checks if the current widget contains data. If it does, the data in the widget is compared to the data in the other password widget. If the data in the widgets is different, an error message is shown to the user. It's necessary to test whether both widgets actually contain data in interactive validation; without this check, the function annoyingly displays an error before the user has the opportunity to enter data into both widgets.
<!DOCTYPE HTML PUBLIC
              "-//W3C//DTD HTML 4.0 Transitional//EN"
              "http://www.w3.org/TR/html4/loose.dtd">
<html>
<head>
  <title>Password Validation</title>

<script type="text/javascript">
<!-- Hide the script
function thesame(value1, value2, description)
{
  if (((value1 != null) ||
       (value1 != "")) &&
       value2 != "" &&
       value1 != value2)
  {
       alert("The " + description + " must be identical.");
       return (false);
  }
  return (true);
}
// end hiding -->
</script>
</head>

<body>
  <h2>Username Form</h2>
  <form
 method="post" action="test.php">
  <br>Username:
  <input type="text" name="userName" size=10>
  <br>Password:
  <input type="password" name="formPassword1" onChange="
    thesame(formPassword1.value, formPassword2.value,
            'passwords');"
    size=10>
  <br>Re-enter password:
  <input type="password" name="formPassword2" onChange="
    thesame(formPassword2.value, formPassword1.value,
            'passwords');"
    size=10>
  <br><input type="submit" value="SUBMIT">
  </form>
</body>
</html>
There are several other events that are commonly trapped and handled in validation:
In this section we present other common tools implemented with JavaScript that aren't particular to web database applications. Examples include:
Mouse rollovers, where an image is changed to highlight an option as the mouse cursor passes over it
Calculating and updating <form> fields based on user changes to data
Interacting with the web browser and windows to trigger events and manipulate presentation
Detecting which browser application and version the user is using
Example 7-4 shows a basic implementation of the common rollover feature used in many web applications.
<!DOCTYPE HTML PUBLIC
              "-//W3C//DTD HTML 4.01 Transitional//EN"
              "http://www.w3.org/TR/html401/loose.dtd">
<html>
<head>
<title>MouseOver Example</title>
</head>

<body bgcolor="#ffffff">
<a href="add_to_cart.php"
  onMouseOut="cart.src='cart_off.jpg'"
  onMouseOver="cart.src='cart_on.jpg'">
<img src="cart_off.jpg" border=0 name="cart"
     alt="cart picture"></a>
</body>
</html>
When the page is first loaded, an image of a shopping cart in plain gray off-mode is shown; the image is used in the front page of the winestore. As usual, the image is loaded with the HTML fragment:
<img src="cart_off.jpg" border=0 name="cart">
The only difference to the usual approach of loading images is that the <img> tag has a name attribute, in this case name="cart".
If the mouse passes over the cart image, an onMouseOver event is generated, and the JavaScript action carried out is:
onMouseOver="cart.src='cart_on.jpg'"
The event handler changes the value of the src attribute of the <img> tag with the name="cart". The result is that a new image is loaded to replace the off-mode image with an on-mode image. In this case, a shopping cart with a blue foreground is shown.
When the mouse leaves the image region, the onMouseOut event is generated and handled with the following JavaScript fragment:
onMouseOut="cart.src='cart_off.jpg'"
This restores the original gray off-mode image. The impression to the user is that the cart element is highlighted as the user focuses on the element; the same technique is used to highlight menu options and to produce pop-up and pull-down menus.
Another common use of JavaScript is to prefill a <form> with data from a calculation. Example 7-5 shows how data can be managed and updated in the winestore shopping cart (this approach isn't actually used in the online winestore).
When the user changes the quantity of wine he intends to purchase, an onChange event is generated. This change event is handled by the update( ) function, which modifies the value attribute of the total widget, showing the new total cost to the user. The new value shown to the user is calculated by multiplying together the quantity.value and the unit.value. Of course, as in all web database applications, the values and mathematics should be rechecked at the server when the <form> is submitted to the server.
<!DOCTYPE HTML PUBLIC
              "-//W3C//DTD HTML 4.01 Transitional//EN"
              "http://www.w3.org/TR/html401/loose.dtd">
<html>
<head>
   <title>Dynamic Form Update Example</title>

<script type="text/javascript">
<!-- Hide the script from old browsers
function update(quantity, unit, total)
{

    total.value = unit.value * quantity.value;
}
// end the hiding -->
</script>
</head>

<body>
<h1>Your Shopping Cart</h1>
<form method="get" action="test.php">
<table border="0" width="100%" cellpadding="0" cellspacing="5">
<tr>
  <td>Quantity </td>
  <td>Wine</td>
  <td>Unit Price</td>
  <td>Total</td>
</tr>

<tr>
  <td><input type="text" name="quantity" value="1"
       size=3 onChange="update(quantity,unit,total);">
  <td>1997 Anderson and Sons Wines Belcombe Grenache</td>
  <td>$<input type="text" value="17.29" name="unit"
        readonly></td>
  <td>$<input type="text" value="17.29" name="total"
        align="right" readonly></td>
</tr>
</table>
<input type="submit" value="Purchase Wines">
</form>
</body>
</html>Unfortunately, JavaScript can be used to annoy. We have all suffered the continual popping-up of new windows without the usual toolbars (these are known as consoles), changes in the browser appearance, and resizing of the browser.
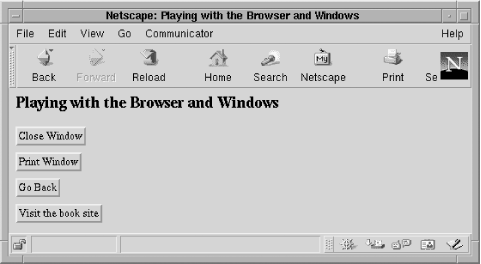
Having said that, adding features that are helpful is desirable. Example 7-6 shows four examples of handlers for buttons that use methods or functions defined for the browser window object. The function window.close( ) closes the focused window, window.print( ) shows the print dialog window, windows.history.go(-1) goes back one page, and window.open( ) opens a new browser window.
<!DOCTYPE HTML PUBLIC
              "-//W3C//DTD HTML 4.01 Transitional//EN"
              "http://www.w3.org/TR/html401/loose.dtd">
<html>
<head>
  <title>Playing with the Browser and Windows</title>
</head>
<body>
<h1>Playing with the Browser and Windows</h1>
<form action="example.7-6.php">
  <input type="button" value="Close Window"
       onClick="window.close( );">
  <br><input type="button" value="Print Window"
      onClick="window.print( );">
  <br><input type="button" value="Go Back"
      onclick="javascript:window.history.go(-1);">
  <br><input type="button" value="Visit the book site"
     onClick="
        window.open('http://www.webdatabasebook.com/',
        'BookSite',
        'toolbar=yes,location=yes,menubar=yes,
        directories=yes,scrollbar=yes,resizable=yes');">
</form>
</body></html>
The page rendered in a Netscape browser is shown in Figure 7-4.

Only window.open( ) has any complexity. The first parameter is the URL to request in the new window, the second is a title, and the third is a set of properties the new window has. Without the list of properties that are included, the default new window has no Location box, no toolbars, no scrollbars, and can't be resized: it's an evil console!
More advanced JavaScript highlights annoying differences in support of standard features by different browsers. Even different versions of Netscape or Internet Explorer support different JavaScript features.
Example 7-7 shows how the browser application name and version can be detected with both JavaScript and PHP. The output of the script rendered in a Netscape browser is shown in Figure 7-5. If a JavaScript script requires customization for a particular product, if statements can carry out actions in different ways. Another common approach in JavaScript-intensive web database applications is to write two sites: one that uses Internet Explorer JavaScript and another that uses Netscape Navigator JavaScript.
<!DOCTYPE HTML PUBLIC
              "-//W3C//DTD HTML 4.01 Transitional//EN"
              "http://www.w3.org/TR/html401/loose.dtd">
<html>
<head>
  <title>Playing with the Browser and Windows</title>
</head>
<body>
<script type="text/javascript">
<!-- Hide the script from old browsers
  var version = navigator.appName
  var number = parseInt(navigator.appVersion)
  alert("You are using the " + version +
        " browser, version " + number);
// end the hiding -->
</script>

This page should pop up a box if you have a JavaScript-capable and enabled
browser.
<br>But, using PHP, we can tell you that you're using the
<? printf("%s", $HTTP_USER_AGENT); ?> browser.
</body></html>
The short examples in this section implement common JavaScript web database features, and we recommend that JavaScript be used only for these simple manipulations and the basic validation tasks. Using JavaScript for more complex tasks may reveal annoying differences between browser applications, browser versions, and different platforms. These differences can be compounded by the fact that the web database application developer usually has little control over the standardization of the client JavaScript environment.
Pointers to books and other resources on JavaScript are included in Appendix E.
NOTE: Building complex JavaScript adds a thicker client to a web database application.This book is focused on thin clients, where the majority of the application logic resides in the middle tier. We recommend that JavaScript be kept simple: complex tasks should be left to the middle-tier scripts, and interfaces should still function correctly even if JavaScript is faulty or disabled.
If complex JavaScript is required or desired, make sure it's tested on all the popular platforms with the popular browser products and ver sions.

Copyright © 2003 O'Reilly & Associates. All rights reserved.