 |  |

Unless a web application is limited to a corporate intranet, it must be designed to support a wide variety of device types. As the upcoming examples will demonstrate, wireless devices are far less consistent than web browsers. This amplifies the need for the clean separation between data and presentation that XML and XSLT offer, because many different presentation styles may be needed to take advantage of specific devices. Java servlets are used to tie everything together, detecting the type of client device and driving the XSLT transformation process.
WML is a relatively new XML-based markup language specifically designed for wireless devices. As such, it is compact, easy to parse, and optimized for small displays. WML is the product of the WAP Forum, an association consisting of over 500 member companies that defines specifications for wireless devices. You can learn more about WML by downloading the specification from http://www.wapforum.org or by reading Learning WML and WMLScript by Martin Frost (O'Reilly).
First of all, WML is an XML-based markup language.[54] This means that, unlike HTML, all WML documents must be well-formed and valid. For instance, all tags must be lowercase and nested properly, and attribute values must be quoted. Example 10-1 lists a WML document.
[54] WML documents are XML documents that conform to one of the WML DTDs.
<?xml version="1.0" encoding="UTF-8"?>
<!DOCTYPE wml PUBLIC "-//WAPFORUM//DTD WML 1.1//EN"
        "http://www.wapforum.org/DTD/wml_1.1.xml">
<wml>
  <card id="home" title="Name Entry">
    <p>Enter your first name:
      <input name="firstName"/>
    </p>
    <p>Enter your age:
      <input name="age" format="*N"/>
    </p>
    <do type="accept">
      <go href="#hello"/>
    </do>
  </card>
  <card id="hello" title="Hello">
    <p>
    Hello there, $(firstName:e)!
    </p>
    <p>
    You claim to be <em>$(age:e)</em> years
    old...can this possibly be true?
    </p>
    <p>Click <a href="#home">here</a> to
       change your answer.</p>
  </card>
</wml>
This particular WML document adheres to Version 1.1 of the WML specification, as indicated by the document type declaration. Unlike HTML, the root element is <wml> , which is commonly known as a deck. The WML deck contains one or more <card> elements, each of which represents a single screen that is displayed on the device. Grouping cards into decks increases performance because the wireless device can make fewer requests to the server as the user navigates from card to card.
The first card in this example prompts the user to enter his first name and age. Unlike HTML form techniques, these values are stored in the WML variables firstName and age. This is much better than posting a form to the server because of the limited bandwidth available to wireless devices. The age field illustrates another interesting feature of WML that does not exist in HTML:
<input name="age" format="*N"/>
The format attribute shown here indicates that the user can enter any number of numeric digits or decimal points.[55] Formats for date entry, telephone numbers, and other known patterns can also be configured using simple pattern strings defined by the WML specification. This is a big advantage over traditional web techniques that require scripting language support to perform client-side validation. Table 10-1 lists all of the format patterns supported by WML 1.1.
[55] Not all devices support this feature.
|
Format |
Displays |
A |
Uppercase letters, symbols, and punctuation characters; not numbers. |
a |
Lowercase letters, symbols, and punctuation characters; not numbers. |
N |
Any number. |
n |
Any number, symbol, or punctuation character. |
X |
Same as A, but includes numbers. |
x |
Same as a, but includes numbers. |
M |
Any character, but the device should try to default to uppercase entry. |
m |
Any character, but the device should try to default to lowercase entry. |
*f |
Any number of the specified characters; f is one of the format codes shown in this table. Must appear at the end of the format string. |
nf |
n is a number from 1 to 9, specifying the number of characters that can be entered. f is one of the format codes shown in this table. Must appear at the end of the format string. |
\c |
Displays a specific character in the field. For instance, NNN\-NN\-NNNN specifies a data format for U.S. social security numbers, allowing the user to enter a number such as 333-22-4444. |
The first card in Example 10-1 finishes with a <do> tag:
<do type="accept">
  <go href="#hello"/>
</do>
This causes a button to appear, which acts like a hyperlink to the #hello URL when the user clicks on it. This is a reference to the second card in the deck. Therefore, the server is not contacted when this particular button is clicked. Figure 10-2 shows how one particular device displays the first and second cards.
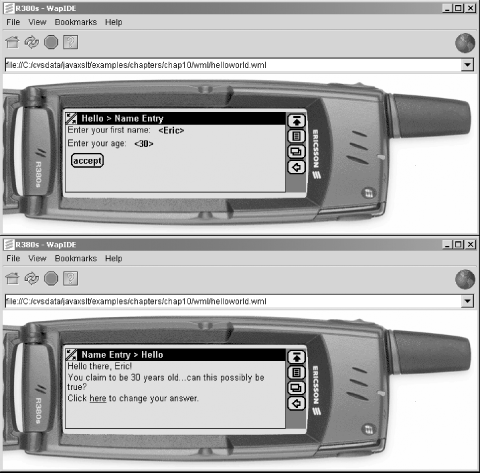
As you can see in the picture, the second card displays the values that were entered in the first card.[56] Here is some of the code again:
[56] Notice that this particular device does not honor the <em> tag when the age is displayed.
Hello there, $(firstName:e)!
This demonstrates how to utilize WML variables, something that is not possible with HTML. The :e at the end of the variable name is optional and instructs the device to perform URL escaping of the text before displaying it. This is useful if the user enters spaces and other characters such as < that may cause problems with the WML.
Hyperlinks in WML look just like hyperlinks in HTML:
<p>Click <a href="#home">here</a> to
The trickiest part about WML is the wide variety of devices that may be in use. Figure 10-3 shows these same two cards on a cellular phone that has a smaller display.
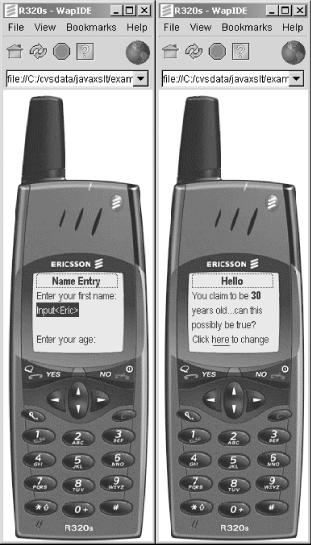
As you can see, the first card does not fit on the display, so the user has to scroll. On the second card, the phone honors the emphasis (<em>) tag when displaying the age, while the first browser in Figure 10-2 does not. While differences like these should diminish as vendors have more time to implement the complete WML specification, there are no guarantees as to how buttons and <input> fields will be displayed. In many cases, <do> tags are mapped to physical buttons on the cell phone keypad rather than displayed as buttons on the screen.
Because of bandwidth constraints, scripting capability is critical for wireless devices. WAP defines a scripting language called WMLScript, which is tightly integrated with WML and features a syntax that is very similar to JavaScript. With WMLScript, form validation and lightweight processing can be performed on the client device, greatly reducing the number of requests to a server.
Wireless Bitmap (WBMP) is a very simple image format that, as expected, is optimized for small devices. WBMP files are black and white and can be created with a number of free tools. There is even a free web site at http://www.teraflops.com/wbmp that will convert GIF, JPEG, and BMP images to WBMP using a browser-based interface.
Again, refer to Learning WML & WMLScript for the complete story on these technologies.
Servlets are important to wireless developers because they can detect the type of client device. Different XSLT stylesheets can then be selected for regular web browsers, sophisticated PDAs, and simple cell phones.
Detecting the type of client is the most important role of the servlet. There are two HTTP header values that are typically used for this purpose: User-Agent and Accept. The text in Example 10-2 shows what an HTTP header looks like for the Ericsson R520m cell phone simulator.
GET / HTTP/1.1
Host: 25.12.44.22
Accept: application/vnd.wap.wmlc, application/vnd.wap.wbxml,
application/vnd.wap.wmlscriptc, */*, text/vnd.wap.wml, application/xml, text/xml,
text/vnd.wap.wmlscript
User-Agent: EricssonR520/R1A
Accept-Charset: *
The HTTP header is text, and each line after the first consists of a name:value pair. The Accept header indicates the MIME content types that this device knows how to display, so searching for text/vnd.wap.wml is a simple way to detect if the client device supports WML. If the client accepts this MIME type, it could be a wireless device.
WARNING: Some browsers may also know how to display text/vnd.wap.wml. The Accept header is not a completely reliable way to determine the client type.
The User-Agent header definitively identifies the device. However, vendors do not consistently follow standards. Table 10-2 lists several user agents reported by various cell phone simulators.
|
Simulator type |
User-Agent |
|---|---|
|
Ericsson R320s |
EricssonR320/R1A |
|
Ericsson R380s |
R380 2.1 WAP1.1 |
|
Ericsson R520m |
EricssonR520/R1A |
|
Motorola |
Motorola VoxGateway/2.0 |
|
Nokia |
Nokia-WAP-Toolkit/2.1 |
|
Openwave |
OWG1 UP/4.1.20a UP.Browser/4.1.20a-XXXX UP.Link/4.1.HTTP-DIRECT |
In general, a model number follows the vendor name. However, the Ericsson R380s does not follow this convention. As mentioned in Chapter 8, "Additional Techniques", almost every web browser reports a User-Agent that begins with the text "Mozilla," which can be used to identify a web browser rather than a wireless device.
From the servlet, it is quite easy to get to these HTTP headers:
protected void doGet(HttpServletRequest req, HttpServletResponse res)
        throws IOException, ServletException {
    String userAgent = req.getHeader("User-Agent");
    String accept = req.getHeader("Accept");

    if (userAgent != null) {
        ...
A more complete example is presented in the section "Movie Theater Example."
Once the client type has been identified as either a web browser or a specific type of wireless device, the response must be sent back. Table 10-3 lists the three most common content types a servlet will encounter.
|
MIME type |
Extension |
Description |
|---|---|---|
|
text/vnd.wap.wml |
.wml |
WML source code |
|
text/vnd.wap.wmlscript |
.wmls |
WMLScript source code |
|
image/vnd.wap.wbmp |
.wmlc |
Wireless Bitmaps |
This simply means that before sending a WML response back to the client device, the following code must be present in the servlet:
public void doGet(HttpServletRequest req, HttpServletResponse res) ... {
    res.setContentType("text/vnd.wap.wml");
    // now obtain a PrintWriter or OutputStream and perform
    // the XSLT transformation...
For dynamically generated pages, this is all that must be done. If a web application also consists of static resources such as WMLScript files and WBMP images, the web application deployment descriptor should also be updated. Example 10-3 lists some additional content that should be added to the deployment descriptor.
  <mime-mapping>
    <extension>.wml</extension>
    <mime-type>text/vnd.wap.wml</mime-type>
  </mime-mapping>
  <mime-mapping>
    <extension>.wmls</extension>
    <mime-type>text/vnd.wap.wmlscript</mime-type>
  </mime-mapping>
  <mime-mapping>
    <extension>.wmlc</extension>
    <mime-type>image/vnd.wap.wbmp</mime-type>
  </mime-mapping>
This effectively tells the web server to use the specified MIME type whenever the client requests files with the listed extensions.
Admittedly, this is a crash course introduction to WML; hopefully a more complete example will clarify some of the concepts.
This example consists of three WML decks and several cards. Through this interface, users can select their city, select a particular movie theater within that city, and finally view showtimes for that theater. The diagram in Figure 10-4 contains the storyboard for this application, showing how each screen links to the next.
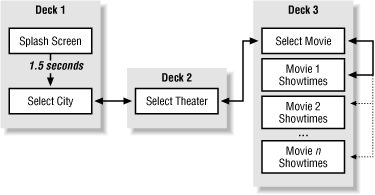
As the illustration indicates, the first deck contains a splash screen that displays for 1.5 seconds. This takes advantage of a WML timer, automatically displaying the city selection page after the timer expires. From this page, the user can select from a list of cities.
The second deck consists of a single card, which shows a list of theaters for the current city. Once the user clicks on a particular city, the third deck is displayed. This deck may have many cards, depending on how many movies are showing in that particular theater. The user can browse from movie to movie without requesting additional data from the server.
For the servlet to dynamically build the appropriate decks and cards, each page requires certain parameters. These parameters are passed along to the XSLT stylesheet so it can select the appropriate data from the XML file. Table 10-4 lists the required parameters for each deck. These will appear in each of the WML files, as well as in the servlet and XSLT stylesheets. If any parameter is invalid or missing, the application merely returns the user to the home page.
|
Deck |
Parameters |
Notes |
|---|---|---|
|
1 |
none |
Shows all cities |
|
2 |
action=theaters city=city_id |
Shows theaters for a single city |
|
3 |
action=showtimes city=city_id theater=theater_id |
Shows all movies for a specific theater in the given city |
To keep things simple for the theater owners, this application produces all pages from a single XML datafile on the server. The DTD for this file is shown in Example 10-4.
<!ELEMENT movies (moviedef+, city+)>
<!ELEMENT moviedef (shortName, longName)>
<!ELEMENT city (name, theater+)>
<!ELEMENT name (#PCDATA)>
<!ELEMENT shortName (#PCDATA)>
<!ELEMENT longName (#PCDATA)>
<!ELEMENT theater (name, movie+)>
<!ELEMENT movie (times)>
<!ELEMENT times (#PCDATA)>
<!ATTLIST city
  id ID #REQUIRED
>
<!ATTLIST movie
  ref IDREF #REQUIRED
>
<!ATTLIST moviedef
  id ID #REQUIRED
>
<!ATTLIST theater
  id ID #REQUIRED
>
It is worth pointing out the difference between a <moviedef> and <movie> element. Basically, a <moviedef> defines a short and long description for a movie in a single place. Since the same movie is likely to be listed in many different theaters, it makes sense to define the <moviedef> once, and then refer to it from other parts of the document using <movie> elements.
Example 10-5 contains a portion of an example XML datafile that adheres to this DTD. This is the data displayed in the upcoming screen shots.
<?xml version="1.0" encoding="UTF-8"?>
<?xml-stylesheet type="text/xsl" href="../xslt/wml/showtimes.xslt"?>
<movies>
  <!-- all movies -->
  <moviedef id="star_wars1">
    <shortName>Star Wars Ep 1</shortName>
    <longName>Star Wars Episode I: The Phantom Menace</longName>
  </moviedef>
  <moviedef id="star_wars4">
    <shortName>Star Wars</shortName>
    <longName>Star Wars: A New Hope</longName>
  </moviedef>
  <moviedef id="star_wars5">
    <shortName>Emp Strikes Back</shortName>
    <longName>The Empire Strikes Back</longName>
  </moviedef>
  ...additional moviedef elements

  <city id="stl">
    <name>St. Louis</name>
    <theater id="westolive16">
      <name>West Olive 16</name>
      <movie ref="star_wars1">
        <times>10:15a, 3:30, 12:30, 5:45, 7:15, 10:30</times>
      </movie>
      <movie ref="star_wars4">
        <times>1:30, 4:00, 6:00</times>
      </movie>
      <movie ref="star_wars5">
        <times>2:30, 4:10, 6:20</times>
      </movie>
      <movie ref="back2future3">
        <times>4:00, 6:00, 8:00, 10:00</times>
      </movie>
    </theater>
    <theater id="stcharles18">
      <name>St. Charles 18</name>
      <movie ref="star_wars4">
        <times>10:15a, 3:30, 12:30, 5:45, 7:15, 10:30</times>
      </movie>
      <movie ref="star_wars5">
        <times>1:30, 4:00, 6:00</times>
      </movie>
      <movie ref="back2future2">
        <times>4:00, 6:00, 8:00, 10:00</times>
      </movie>
    </theater>

    ... additional theater elements
  </city>

  ... additional city elements

</movies>
As you can see in the XML, nothing in the data indicates that the output must be WML. In fact, this application can support both XHTML and WML output via different XSLT stylesheets. Of course, WML support is the primary goal of this application. Therefore, <shortName> is included to support wireless devices. If this were targeted towards only web browsers, this element would not be required.
When using XSLT to produce XHTML or WML, it is a good idea to start with prototypes. This is because XSLT adds a level of indirection that makes it hard to visualize the result. It is much easier to simply create static WML first, test it using a simulator, and then develop the XSLT stylesheets once everything is working.
Example 10-6 lists the first WML deck used in this example. As mentioned earlier, this deck contains two cards, the first of which is a splash screen that displays for 1.5 seconds.
<?xml version="1.0" encoding="UTF-8"?>
<!DOCTYPE wml PUBLIC "-//WAPFORUM//DTD WML 1.1//EN"
"http://www.wapforum.org/DTD/wml_1.1.xml">
<wml>
<card ontimer="#home" title="ABC Theaters" id="splash">
<timer value="15"/>
<p align="center">
<big>Welcome to ABC Theaters</big>
</p>
<p>Mmmm...Popcorn...</p>
<do type="accept">
<go href="#home"/>
</do>
</card>
<card newcontext="true" title="Home" id="home">
<p align="center">Please select your city:
<select multiple="false" name="city">
<option value="chi">Chicago</option>
<option value="stl">St. Louis</option>
<option value="seb">Sebastopol</option>
</select>
</p>
<p>
<em>
<a href="movieguide?action=theaters&city=$(city)">Show Theaters...</a>
</em>
</p>
</card>
</wml>The ontimer attribute of the first card indicates the URL to load when the <timer> element expires. The timer value is 15, meaning 15 tenths of a second, or 1.5 seconds. This first card also contains a <do> element, allowing the user to click on a button to jump to the home page if she does not want to wait for the timer to expire. Like XHTML, the <p> element indicates a paragraph of text, causing text to appear on the next line of the display.
The next card contains a <select> element, allowing the user to select from a list of cities. The value of the selection is assigned to the city variable, making it easy to submit the information to the server with the <a> tag:
<a href="movieguide?action=theaters&city=$(city)">Show Theaters...</a>
This is actually the final URL used by the finished application, rather than a prototype URL. During the prototyping phase, the following link is more appropriate:
<a href="theaters.wml">Show Theaters...</a>
By using URLs to static WML files, it is at least possible to navigate from page to page before the servlet is written. Figure 10-5 shows how these first two pages look on a cell phone simulator.
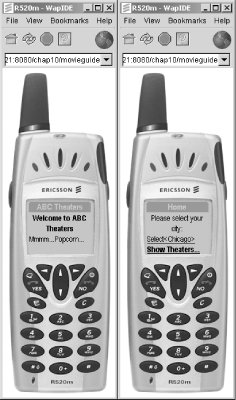
The image to the left shows the splash screen, which is replaced by the image on the right after 1.5 seconds. On this particular phone, the user navigates with the up and down arrows, making selections by clicking on the telephone's YES button.
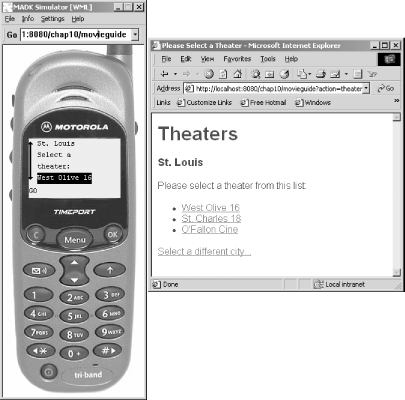
The next WML page, shown in Example 10-7, shows a list of theaters for the current city. In this example, the list uses a series of hyperlinks. This can also be done using a <select> tag, as shown in the previous example. However, the user can see the entire list when hyperlinks and <br/> tags are used. Of course, on smaller displays the user will typically have to scroll down to see all items.
<?xml version="1.0" encoding="UTF-8"?>
<!DOCTYPE wml PUBLIC "-//WAPFORUM//DTD WML 1.1//EN"
"http://www.wapforum.org/DTD/wml_1.1.xml">
<wml>
<card title="Theaters" id="theaters">
<p>
<big>St. Louis</big>
</p>
<p>Select a theater:</p>
<p>
<a href="movieguide?action=showtimes&city=stl&theater=westolive16">
West Olive 16</a>
<br/>
<a href="movieguide?action=showtimes&city=stl&theater=stcharles18">
St. Charles 18</a>
<br/>
<a href="movieguide?action=showtimes&city=stl&theater=ofallon">
O'Fallon Cine</a>
<br/>
</p>
<p>
<em>
<a href="movieguide">Change city...</a>
</em>
</p>
</card>
</wml>This WML file is shown on the left side of Figure 10-6 using a different cell phone simulator. On the right side of this figure, an XHTML representation of the same data is shown in a web browser. These images were generated using the same servlet and XML datafile but different XSLT stylesheets.
The final deck is shown in Example 10-8. As mentioned earlier, this consists of several cards, one per movie.
<?xml version="1.0" encoding="UTF-8"?>
<!DOCTYPE wml PUBLIC "-//WAPFORUM//DTD WML 1.1//EN" "http://www.wapforum.org/DTD/wml_
1.1.xml">
<wml>
<template>
<do name="common_prev" label="Back" type="prev">
<prev/>
</do>
</template>
<card title="Movies" id="movies">
<do name="common_prev" type="prev">
  <noop/>
</do>
<p>
<big>O'Fallon Cine</big>
</p>
<p>Select a movie:</p>
<p>
<a href="#jones1">Raiders Lost Ark</a>
<br/>
<a href="#jones2">Temple of Doom</a>
<br/>
<a href="#back2future2">Back 2 Future 2</a>
<br/>
</p>
<p>
<em>
<a href="movieguide?action=theaters&city=stl">Change theater...</a>
</em>
</p>
</card>
<card title="Showtimes" id="jones1">
<p>
<em>Raiders of the Lost Ark</em>
</p>
<p>10:15a, 3:30, 12:30, 5:45, 7:15, 10:30</p>
</card>
<card title="Showtimes" id="jones2">
<p>
<em>Indiana Jones and The Temple of Doom</em>
</p>
<p>1:30, 4:00, 6:00</p>
</card>
<card title="Showtimes" id="back2future2">
<p>
<em>Back to the Future 2</em>
</p>
<p>4:00, 6:00, 8:00, 10:00</p>
</card>
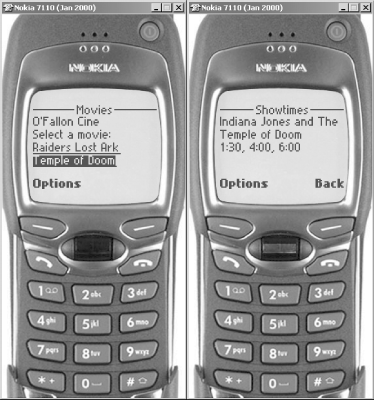
</wml>This WML file illustrates how to define and use a <template>, which is a piece of reusable markup that can be shared by all cards in the deck. This particular template defines a Back button displayed on each instance of the Showtimes card, allowing the user to easily return to the list of movies.
Since the Back button should not appear on the movie list card, it is shadowed as follows:
<do name="common_prev" type="prev"> <noop/> </do>
The <noop/> element stands for "No Operation" and effectively removes the <do> element defined by the common_prev template. When cards define elements with the same names as templates, the card elements take precedence. The card can choose to modify the behavior of the template or simply suppress it with the <noop/> tag as shown here.
The screen shot shown in Figure 10-7 illustrates how these cards look in a cell phone. As shown, the Back button does not appear in the list of movies but does appear in the Showtimes card.
The final screen shot, shown in Figure 10-8, shows how a web browser takes advantage of its large display area by displaying all of the information in a single table. Once again, this is accomplished with a different XSLT stylesheet that converts the XML to XHTML instead of WML.
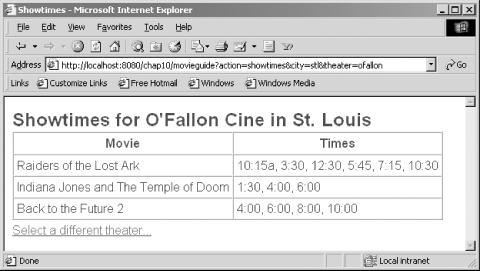
Although WML does define a <table> element, it has almost no chance of fitting on a cell phone display and is not widely supported by currently available devices.
This application uses a single servlet, listed in Example 10-9. This servlet has three primary functions:
Parse request parameters and determine which page to display next.
Identify the client type.
Perform the appropriate XSLT transformation.
package chap10;

import java.io.*;
import javax.servlet.*;
import javax.servlet.http.*;
import javax.xml.transform.*;
import javax.xml.transform.stream.*;

/**
 * A servlet that shows schedules for movie theaters in various
 * cities. Supports normal web browser clients as well as WAP-enabled
 * PDAs and cell phones.
 */
public class MovieServlet extends HttpServlet {

    // currently supports two types of clients; could be expanded later
    private static final int XHTML_CLIENT_TYPE = 1;
    private static final int WML_CLIENT_TYPE = 2;

    // three pages in this web app
    private static final int HOME_PAGE = 100;
    private static final int THEATERS_PAGE = 101;
    private static final int SHOWTIMES_PAGE = 102;

    /**
     * This servlet supports GET and POST.
     */
    public void doGet(HttpServletRequest req, HttpServletResponse res)
            throws IOException, ServletException {
        doPost(req, res);
    }

    public void doPost(HttpServletRequest req, HttpServletResponse res)
            throws IOException, ServletException {
        try {
            String action = req.getParameter("action");
            String city = req.getParameter("city");
            String theater = req.getParameter("theater");

            // default to the home page
            int pageToShow = HOME_PAGE;

            if ("theaters".equals(action) && city != null) {
                // city is a required parameter for a theater list
                pageToShow = THEATERS_PAGE;
            } else if ("showtimes".equals(action) && city != null
                    && theater != null) {
                // city and theater are required parameters for showtimes
                pageToShow = SHOWTIMES_PAGE;
            }

            // set the content type of the response
            int clientType = determineClientType(req);
            switch (clientType) {
            case XHTML_CLIENT_TYPE:
                res.setContentType("text/html");
                break;
            case WML_CLIENT_TYPE:
                res.setContentType("text/vnd.wap.wml");
                break;
            default:
                res.sendError(HttpServletResponse.SC_INTERNAL_SERVER_ERROR);
                return;
            }

            File xsltFile = locateStylesheet(req, clientType, pageToShow);

            // prepare for the transformation using JAXP
            TransformerFactory transFact = TransformerFactory.newInstance( );
            Transformer trans = transFact.newTransformer(
                    new StreamSource(xsltFile));

            // pass parameters to the XSLT stylesheet
            if (city != null) {
                trans.setParameter("city_id", city);
            }
            if (theater != null) {
                trans.setParameter("theater_id", theater);
            }

            // all pages, both WML and XHTML, share the exact same
            // XML data file
            InputStream xmlIn = getServletContext( ).getResourceAsStream(
                    "/WEB-INF/xml/movies.xml");

            // do the transformation
            trans.transform(new StreamSource(xmlIn),
                    new StreamResult(res.getOutputStream( )));
        } catch (TransformerException te) {
            throw new ServletException(te);
        }
    }

    /**
     * @param clientType one of the constants defined in this class, either
     *        WML_CLIENT_TYPE or XHTML_CLIENT_TYPE.
     * @param pageToShow one of the _PAGE constants defined by this class.
     * @return a file representing the appropriate XSLT stylesheet.
     */
    private File locateStylesheet(HttpServletRequest req,
            int clientType, int pageToShow) {
        String xsltDir = null;
        switch (clientType) {
        case WML_CLIENT_TYPE:
            xsltDir = "wml";
            break;
        case XHTML_CLIENT_TYPE:
            xsltDir = "xhtml";
            break;
        default:
            throw new IllegalArgumentException("Illegal clientType: "
                    + clientType);
        }

        String xsltName = null;
        switch (pageToShow) {
        case HOME_PAGE:
            xsltName = "home.xslt";
            break;
        case THEATERS_PAGE:
            xsltName = "theaters.xslt";
            break;
        case SHOWTIMES_PAGE:
            xsltName = "showtimes.xslt";
            break;
        default:
            throw new IllegalArgumentException("Illegal pageToShow: "
                    + pageToShow);
        }

        // locate a platform-dependent path
        String fullPath = getServletContext( ).getRealPath(
                "/WEB-INF/xslt/" + xsltDir + "/" + xsltName);
        return new File(fullPath);
    }

    /**
     * Determines the type of user agent.
     *
     * @return either XHTML_CLIENT_TYPE or WML_CLIENT_TYPE.
     */
    private int determineClientType(HttpServletRequest req) {
        // first check for normal web browsers that claim to be
        // mozilla-compliant
        String userAgent = req.getHeader("User-Agent");
        if (userAgent != null
                && userAgent.toLowerCase( ).startsWith("mozilla")) {
            return XHTML_CLIENT_TYPE;
        }

        // if the client accepts wml, it must be a WAP-compatible device
        String accept = req.getHeader("Accept");
        if (accept != null && accept.indexOf("text/vnd.wap.wml") > -1) {
            return WML_CLIENT_TYPE;
        }

        // otherwise, default to XHTML
        return XHTML_CLIENT_TYPE;
    }
}
This servlet determines the client type by looking at the HTTP User-Agent and Accept headers. This logic is encapsulated in the determineClientType( ) method, which first checks the User-Agent for Mozilla-compatible browsers such as Microsoft Internet Explorer and Netscape Navigator. If the client is not one of these browsers, it then checks the Accept header for text/vnd.wap.wml. If both tests fail, the servlet defaults to XHTML because the device did not claim to accept the WML content type.
Once the client browser type is identified, the HTTP Content-Type response header is set to the appropriate MIME type:
switch (clientType) {
case XHTML_CLIENT_TYPE:
    res.setContentType("text/html");
    break;
case WML_CLIENT_TYPE:
    res.setContentType("text/vnd.wap.wml");
    break;
default:
    res.sendError(HttpServletResponse.SC_INTERNAL_SERVER_ERROR);
    return;
}
The default case will occur only if the servlet has a bug. Therefore, it simply causes the code to fail with an internal server error. A helper method called locateStylesheet( ) is then used to locate the appropriate XSLT stylesheet:
File xsltFile = locateStylesheet(req, clientType, pageToShow);
In this application, there are two sets of XSLT stylesheets. One resides in a directory named wml, and another resides in a directory named xhtml. Just like examples shown in previous chapters, ServletContext is utilized to locate these files in a portable manner:
String fullPath = getServletContext( ).getRealPath(
        "/WEB-INF/xslt/" + xsltDir + "/" + xsltName);
Last but not least, the XSLT transformation is performed using the JAXP API.
This application consists of six XSLT stylesheets. Three of these stylesheets are listed here and are used to generate the three WML decks. The other three are used to generate XHTML and can be downloaded along with the rest of the examples in this book. The first stylesheet, shown in Example 10-10, is responsible for creating the home deck.
<?xml version="1.0" encoding="UTF-8"?>
<!--
***********************************************************************
** Produces the home page for WML-enabled devices.
********************************************************************-->
<xsl:stylesheet version="1.0"
xmlns:xsl="http://www.w3.org/1999/XSL/Transform">
<xsl:output method="xml"
version="1.0" encoding="UTF-8" indent="yes"
doctype-public="-//WAPFORUM//DTD WML 1.1//EN"
doctype-system="http://www.wapforum.org/DTD/wml_1.1.xml"/>
<!--
*********************************************************************
** The main template; creates the deck and the home card.
******************************************************************-->
<xsl:template match="/movies">
<wml>
<!-- call a template to produce the splash screen -->
<xsl:call-template name="createSplashCard"/>
<card id="home" title="Home" newcontext="true">
<p align="center">
Please select your city:
<select name="city" multiple="false">
<xsl:apply-templates select="city"/>
</select>
</p>
<p>
<em>
<a href="movieguide?action=theaters&city=$(city)"
>Show Theaters...</a>
</em>
</p>
</card>
</wml>
</xsl:template>
<!--
*********************************************************************
** Produce a single <option> element for a city
******************************************************************-->
<xsl:template match="city">
<option value="{@id}">
<xsl:value-of select="name"/>
</option>
</xsl:template>
<!--
*********************************************************************
** Create the splash screen.
******************************************************************-->
<xsl:template name="createSplashCard">
<card id="splash" title="ABC Theaters" ontimer="#home">
<timer value="15"/>
<p align="center">
<big>Welcome to ABC Theaters</big>
</p>
<p>Mmmm...Popcorn...</p>
<do type="accept">
<go href="#home"/>
</do>
</card>
</xsl:template>
</xsl:stylesheet>This is actually a very simple stylesheet. The critical feature is the <xsl:output> element, which specifies the XML output method and the WML DTD. This application adheres to Version 1.1 of WML for maximum compatibility with existing cell phones, although newer versions of WML are available. For these versions, use the newer DTDs found at http://www.wapforum.org.
The only marginally difficult part of the stylesheet is the following line:
<a href="movieguide?action=theaters&city=$(city)">
Show Theaters...</a>This creates the hyperlink to the next deck, passing parameters for the action and city. The ampersand character (&) must be written as & for the XML parser to handle this attribute correctly. Although the $(city) syntax looks a lot like an XSLT Attribute Value Template, it is actually a WML variable.[57] This is how the selected city is sent to the servlet when the user clicks on the hyperlink. With ordinary XHTML, this can only be accomplished using a form or a scripting language.
[57] Recall from Chapter 2, "XSLT Part 1 -- The Basics" that XSLT AVTs are written like {$var}.
The stylesheet shown in Example 10-11 is responsible for creating a list of theaters in a city.
<?xml version="1.0" encoding="UTF-8"?>
<!--
***********************************************************************
** Produces a list of theaters for WML-enabled devices.
********************************************************************-->
<xsl:stylesheet version="1.0" xmlns:xsl="http://www.w3.org/1999/XSL/Transform">
<xsl:param name="city_id" select="'stl'"/>
<xsl:output method="xml"
version="1.0" encoding="UTF-8" indent="yes"
doctype-public="-//WAPFORUM//DTD WML 1.1//EN"
doctype-system="http://www.wapforum.org/DTD/wml_1.1.xml"/>
<!--
*********************************************************************
** The main template; creates the deck and the theaters card.
******************************************************************-->
<xsl:template match="/movies">
<wml>
<card id="theaters" title="Theaters">
<!-- select the appropriate city -->
<xsl:apply-templates select="city[@id=$city_id]"/>
<p>
<em>
<a href="movieguide">Change city...</a>
</em>
</p>
</card>
</wml>
</xsl:template>
<!--
*********************************************************************
** Show details for a city.
******************************************************************-->
<xsl:template match="city">
<p>
<big><xsl:value-of select="name"/></big>
</p>
<p>Select a theater:</p>
<p>
<!-- show a list of all theaters in this city -->
<xsl:apply-templates select="theater"/>
</p>
</xsl:template>
<!--
*********************************************************************
** Create a link for an individual theater.
******************************************************************-->
<xsl:template match="theater">
<a href="movieguide?action=showtimes&city={
$city_id}&theater={@id}">
<xsl:value-of select="name"/>
</a>
<br/>
</xsl:template>
</xsl:stylesheet>Unlike the first stylesheet, this one requires a parameter for the city:
<xsl:param name="city_id" select="'stl'"/>
For testing purposes, the parameter defaults to stl, but in the real application it should always be passed from the servlet. This is necessary because one big XML file contains data for all cities. This parameter allows the stylesheet to extract information from this file for a single city. For example, the first <xsl:apply-templates> uses a predicate to select the city whose id attribute matches the city_id stylesheet parameter:
<xsl:apply-templates select="city[@id=$city_id]"/>
The remainder of this stylesheet is very basic, simply outputting a list of theaters in the city. The final stylesheet, shown in Example 10-12, creates a list of showtimes for a movie theater. This is the most complex stylesheet merely because it produces multiple cards.
<?xml version="1.0" encoding="UTF-8"?>
<!--
***********************************************************************
** Produces a list of showtimes for WML-enabled devices.
********************************************************************-->
<xsl:stylesheet version="1.0" xmlns:xsl="http://www.w3.org/1999/XSL/Transform">
<xsl:param name="city_id" select="'stl'"/>
<xsl:param name="theater_id" select="'ofallon'"/>
<xsl:output method="xml"
version="1.0" encoding="UTF-8" indent="yes"
doctype-public="-//WAPFORUM//DTD WML 1.1//EN"
doctype-system="http://www.wapforum.org/DTD/wml_1.1.xml"/>
<!--
*********************************************************************
** The main template; creates the deck and the movies card.
******************************************************************-->
<xsl:template match="/movies">
<wml>
<!-- generate the WML template -->
<template>
<do type="prev" label="Back" name="common_prev">
<prev/>
</do>
</template>
<card id="movies" title="Movies">
<!-- shadow the template in this card -->
<do type="prev" name="common_prev">
<noop/>
</do>
<!-- select the theater that matches the city_id and
theater_id stylesheet parameters -->
<xsl:apply-templates
   select="city[@id=$city_id]/theater[@id=$theater_id]"/>
</card>
<!-- generate more cards, one per movie -->
<xsl:apply-templates
   select="city[@id=$city_id]/theater[@id=$theater_id]/movie"
   mode="createCard"/>
</wml>
</xsl:template>
<!--
*********************************************************************
** Show more information about a theater.
******************************************************************-->
<xsl:template match="theater">
<p>
<big>
<xsl:value-of select="name"/>
</big>
</p>
<p>Select a movie:</p>
<p>
<xsl:apply-templates select="movie"/>
</p>
<p>
<em>
<a href="movieguide?action=theaters&city={$city_id}">
Change theater...</a>
</em>
</p>
</xsl:template>
<!--
*********************************************************************
** Show more information about a movie in the main card.
******************************************************************-->
<xsl:template match="movie">
<xsl:variable name="curId" select="@ref"/>
<!-- the hyperlink text is the shortName from the <moviedef> -->
<a href="#{$curId}">
<xsl:value-of select="/movies/moviedef[@id=$curId]/shortName"/>
</a>
<br/>
</xsl:template>
<!--
*********************************************************************
** Create a card for a movie that lists showtimes.
******************************************************************-->
<xsl:template match="movie" mode="createCard">
<xsl:variable name="curId" select="@ref"/>
<card id="{$curId}" title="Showtimes">
<p>
<em>
<xsl:value-of select="/movies/moviedef[@id=$curId]/longName"/>
</em>
</p>
<p>
<xsl:value-of select="times"/>
</p>
</card>
</xsl:template>
</xsl:stylesheet>As described earlier in this chapter, this deck creates a template that defines a Back button visible on all but the first card. The template is produced just before the first card, which also happens to be the one card that shadows the template with a <noop/> element.
The following <xsl:apply-templates> element selects the correct city and theater based on the stylesheet parameters city_id and theater_id:
<xsl:apply-templates select="city[@id=$city_id]/theater[@id=$theater_id]"/>
Although this syntax was covered in detail back in Chapter 2, "XSLT Part 1 -- The Basics", here is a quick review of how it works:
Select all <city> children of the <movies> element.
Use the predicate [@id=$city_id] to narrow this list down to the correct city.
Select all <theater> children of the <city>.
Use the predicate [@id=$theater_id] to narrow this list down to a single <theater>.
After the home card is created, <xsl:apply-templates> is used to create one card per movie:
<xsl:apply-templates select="city[@id=$city_id]/theater[@id=$theater_id]/movie" mode="createCard"/>
This uses template modes, a technique covered in Chapter 3, "XSLT Part 2 -- Beyond the Basics". It causes the following template to be instantiated, since it has a matching mode:
<xsl:template match="movie" mode="createCard">
  ...produce a card containing showtimes for a movie
</xsl:template>

Copyright © 2002 O'Reilly & Associates. All rights reserved.